Sunday, July 17, 2016

Weston goes to Bermuda


Seamwork Magazine's Weston Shorts Pattern Review


Weston
Seamwork Weston
(follow the link above to view and purchase this pattern)

How do they do it?  Somehow Seamwork always knows exactly what I want to sew and wear right now.  That is certainly true of the Weston Shorts pattern in the June issue.  I printed the pattern and had two pair done up in no time.  I have been wearing them constantly.


First up, a pair in dark blue chambray.  I added a little length to give these a vintage bermuda shorts vibe..  Other than the length, I made no alterations, and found the PDF easy to assemble and the directions easy to follow.  The directions for the zip fly are particularly clear and well illustrated.

My only criticism of the pattern is that it suggests you attach the buttons on the waistband before making the buttonholes.  I always make the buttonholes first, then mark the openings onto the waistband underneath to get perfect button placement.

I'm wearing these with my Tilly and the Buttons Agnes tee top; another great summer pattern.

My second pair of Westons are in black denim.


Yes, I am copycating the model.  I can just hear her singing,
"If I were you, I would want to be me, too."

And I do.

Goodbye low waisted shorts.  I never liked you anyway.

Xx Piper

The contents of this blog are property of the author, unless otherwise indicated.  Please do not copy or repost without permission.  Thank you.


Sunday, July 10, 2016

Vintage Pledge Playsuit

If you are a fan of the Vintage Pledge, you have probably been enjoying the Vintage Pledge July Estravaganza. The lovely sewists who make the vintage pledge have inspired me to share more of my makes from vintage patterns.

I have had a mail order playsuit pattern in my collection for a while.


Reader Mail Patterns was a company that sold patterns to home sewists through newspaper and magazine ads.  You could send the price of the pattern and a slip of paper with your address on it, and an order form to a New York address, and the company would mail you a lovely envelope with your self address attached and your pattern inside.  The most common brand names Reader Mail used were Anne Adams and Marian Martin.  Someday I will write a longer post about this interesting piece of sewing history.  I have a number of these patterns in my collection.

This particular pattern came to me in well used condition.  The outer envelope is dated 1958, although the pattern itself has an earlier vibe to it.  I think the pattern and envelope may be a second marriage as opposed to an original pair.

I made this little cutie up in a cotton blend from Gertie's summer fabric collection, purchased at Joanns, and added a self belt with a vintage mother-of-pearl buckle.  It fastens with a front zipper.  Here's a photo of the finished playsuit; perfect for the record breaking heat we are having here this summer!


And i followed through on my pledge to set up an instagram account and post it!

Xx Piper

The contents of this blog are property of the author.  Please do not use without permission.  Thank you.

Friday, June 17, 2016

Four Steps to Pattern Matching a Striped Tee Top

Don't you just love a stripey tee?

www.pinterest.com

First popularized by Coco Chanel as women's casual wear, a boatneck stripey tee is often referred to as a Breton tee, after the region of France called Bretagne. Sailors from this region sported knit tee shirts in various stripe patterns of the colors red, blue, white and black

I found some gorgeous cotton knit on clearance the other day and scooped up four yards.  I made these tees using the Lark Tee Pattern.


The Lark is a long, loose tee with straight sides and a loose fit.  The pattern provides boat neck, scoop neck, v neck and crew neck options as well as three sleeve lengths.  I did a bit of hacking to create these striped darlings.  From the left we have a shortened, boat neck short sleeve tee, a similar tee lengthened to tee dress length, and a smaller size scoop neck version, slashed and spread to make it flowy and cut on the bias.  (Oh yes, I have been watching The Great British Sewing Bee and the bias top challenge.)

In case you have never made a stripey tee before, I thought I'd put together a quick tutorial on how to cut it out so that the stripes match at the side seams and across the sleeves and bodice.

Four Steps to Pattern Matching a Striped Tee Top

1.  Cut out the tee shirt front  

You can place the pattern piece for the front on the fold if you carefully match the stripes on both layers.  Alternativley, cut from a single layer, flipping the pattern piece over to cut the second half.  If you are new to sewing, it may be easier for you to create a pattern piece of the whole front first, then cut it out all at once.  If your tee is straight across the hem like the Lark, you can place the hem edge on a stripe to keep the stripes straight.

2.  Match the back

Now that you've cut the front out, cut the back of the tee out so that the stripes will match at the side seams.  To do this, lay out your material and lay your back pattern piece on it.  Lay out the cut front next to it, and move the pattern up and down until the stripe pattern matches at the point of the armscye.


Cut out the back.  (Again you can place the pattern on the fold and cut double layer with stripes carefully matched through both layers, or cut as a single layer.)

3.  Cut a sleeve

Next lay out the sleeve pattern on a single layer of fabric.  Match the stripes at the armscye of the sleeve to the armscye of the front.  Cut out your first sleeve.


4.  Cut another sleeve

Use the cut sleeve as a pattern to cut the second sleeve.  Turn the sleeve over, so right sides are facing.  Move the cut sleeve around until the stripes exactly match the fabric underneath, making it seem to "disappear."


Cut out the second sleeve.

Et voila, you are ready to sew up your stripey tee with a beautiful pattern match.

A few additional hints:
  • Baste and check the stripe match before sewing each seam.  This will prevent those stripes from slipping out of place.  I actually hand baste because I have more control.
  • Buy extra fabric when you plan to match stripes.  The larger the stripe, the more you will need to buy. You will also need more fabric if you have stripes of more than one color or a irregular stripe pattern.  
  • I prefer to hem with a darker stripe at the bottom, it makes the pattern appear more grounded
And in case you were wondering if guys can rock a striped tee, too...
 
www.pinterest.com

Oh yes, they can.

Xx Piper

The content of this blog is property of the owner, unless noted otherwise.  Please do not copy without permission.  Thank you.

Friday, June 3, 2016

Cats and Sergers


What is it about cats and sergers? 

Okay, so obviously; many threads going up and down, a swipe or two  is inevitable.  But I figured, like the sewing machine, after a while the thrill would die.  Especially since Mama has left out lovely spools and yarn scraps for the kitties to play with.

Nope, sorry.  I start to serge and after a few rounds of boxing my opponents retreat.  But heaven forbid I leave for a second without lowering the thread and covering the machine.  If I forget, I return to an intricate web of tangled threads and two guilty looking felines unable to break free.

Close the door to the sewing room?  Ah, to have a sewing room. What luxury.  To have a house in which cats and dogs peacefully coexist sharing the same spaces. And as long as I'm dreaming, my family would respectfully knock upon that fantasy sewing room door before allowing animals of various types entry.  Until then, I expect to see lots of this:


And really, I can't complain.  La vie est bonne.


Xx Piper

The contents of this blog belong to the owner.  Please do not use without permission.  Thank you,

Sunday, May 22, 2016

Phantom Photos


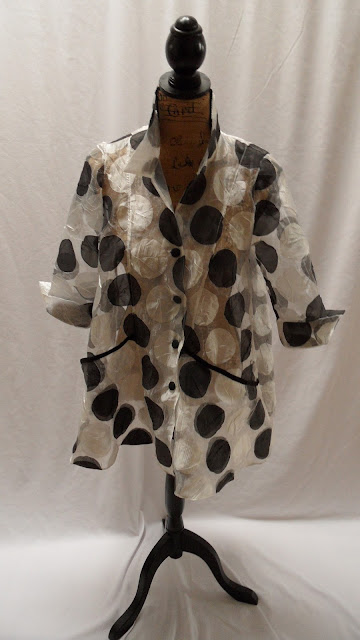
 Here is my Phantom Jacket from Sew Chic Patterns.  Above you see me modeling in the pose shown on the pattern cover.


And here it is on my mannequin, Colette.
Here we stand side by side, allowing you to see the highwaisted crop pant pattern included with the jacket.

And a few details about construction....
I sewed the seams using my serger and a three thread overlock stitch.  This involved removing the left most needle from the serger.  The effect is a narrower serged seam.  The organza sewed up beautifully, but unpicking a seam just was not an option because the fabric is so delicate.  I was able to do fairly well by hand basting before sewing, but I did have to recut one sleeve and put it in a second time.  I was able to save the bodice by cutting the sleeve away.  Again, this material does not take kindly to the seam ripper.  I finished the hem by serging then turning and top stitching.  I used the machine to make the buttonholes, and they went in perfectly, although I was holding my breath the entire time.  The sharp eyed among you will have noticed a little waving along the center front button placket.  This is actually not due to button placement, but rather how I dealt with the front placket pieces. Because these pieces are designed to fold over, the pattern of the organza is doubled on this section.  This is charming with tiny polka dots, but with my large dots, it would have been dizzying.  So I cut the pattern piece in half vertically and made the part that folds under out of plain white organza.  What I didn't anticipate was that because my dotted organza has a slight crinkle texture to it, it stretched and flattened a little as I sewed it, while the plain organza did not; thus the waver.  I don't find it to be that noticeable.

This was a really adventurous, fun challenge for me.  I would sew this pattern again in a heartbeat, especially if I ever run across organza  with tiny dots!  I would not ever try to sew it in a fabric that requires a pattern match again;  possible, but not desirable.

I feel very chic in my Phantom dream jacket, and if you make one of your own, be ready for people who had their heyday in the fifties to stop you and tell you that you look like Audrey Hepburn (!)


Oh,and one more thing; cats loooove organza, but organza does not love cats!

Xx Piper


Please note that the contents of this blog are property of the author.  Please do not use without permission.  Thank you.

Monday, May 16, 2016

Phantom Dreams

"Poetry is a phantom script, telling how rainbows are made and why they go away"-Carl Sandberg


Last year when the lovely Laura of Sew Chic Patterns offered to send a free pattern to anyone who bought a pattern, I selected the stunning Phantom as my free pattern.  It was perfect for a free pattern; the stuff of dreams, a pattern you fall in love with, want to own, but can't realistically see yourself making.
www.sewchicpatterns.com

How does one even find white organza with black dots, much less sew up something completely sheer?  Serger? Handrolled hems?  And then, there it was in with the fancy fabrics at mundane Joanns.  A black and white spotted organza.  I bought the rather pricey yardage with a coupon and thought maybe I can.

When I got the yardage home and spread it on the table it looked like this:


The polka dots were obviously larger, but I figured that was the closest I would get, and it would work.  I opened the pattern with due reverence, the sun shining on the directions, the mourning doves singing, and thought....Oh, dear, maybe I can't.

My spots are not random, they are placed in geometric lines, so they basically act as stripes, and this pattern is totally unsuitable for stripes.  Look at that front facing cut at an angle, AND pockets.  What was I thinking.  Could I possibly pattern match those dots?

To keep it short, I could and I did.  I cut the back as one piece, matched the fronts, matched the pockets, got clever with the fold over on the front facing and did it.  I don't think I could have without Laura's encouragement.  I emailed her about the trim on the pockets, and she emailed me back and said, "I will dream with you."

Here is the work in progress:


My phantom dream is finished, and I have sewn the pants included in the pattern and pictured above as well.  Would you care to see photos?  Stay tuned for the big reveal and more construction details.  This will be my first Vintage Pattern Pledge make!

Xx Piper


All contents of this blog are property of the author unless otherwise indicated.  Please do not use without permission.  Thank you.


Sunday, May 1, 2016

Joining the Vintage Pledge 2016

Well, hello!


What's new, you ask?  It looks like I haven't been sewing since February, doesn't it?  Au contraire, I have been sewing, I just haven't been blogging.  Consequently, I am joining the Vintage Pledge 2016.

The Vintage Pledge is a social media group hosted by Kestrel Makes and A Stitching Odyssey. Seamsters who want to participate make a pledge to sew vintage in 2016.  The pledge can be whatever one wants related to vintage sewing.  Since it's fairly inevitable I will be involved in sewing up vintage and vintage inspired patterns this year, I'm taking my pledge in a different direction:

I, Piper Springs, pledge to blog about my vintage and vintage inspired makes this year, AND start an instagram feed.

Here's a sneak peak at my latest vintage inspired make:

More soon.  A bientot!

Xx Piper

All contents of this blog are property of the author.  Please do not use without permission.  Thank you.